Properties Menu - Thresholds
Thresholds let the user highlight specific values in the chart. In the Vitara grid chart, we can apply thresholds for metrics and attributes. Attributes thresholds is implemented in 4.6.1 version. Applying thresholds is so easy in the Vitara grid chart.
How to open the Threshold Editor window
We can open ‘threshold editor’ window in any of the below mentioned three ways.
Using the ‘Edit’ button:
Move the cursor on the Vitara grid chart, ‘Edit’ button will appear. Click on the ‘Edit’ button to open the properties window. In the properties window select ‘Thresholds’ tab. Click on the ‘Manage Thresholds’ tab.

Using the ‘Hamburger button’:
Move the cursor on the header of any column, hamburger button will appear at the rightmost corner. Click on the hamburger button. A properties popup window will appear. Expand the ‘Thresholds’ tab and click on the ‘Manage Thresholds’ tab.

Using ‘Right click’ on the chart:
Right click on any part of the Vitara grid chart. In the property popup window, expand the ‘Thresholds’ tab and select the ‘Manage Thresholds’ tab.

Apply Thresholds
Below is a screenshot of the threshold editor window. Click on ‘Add’ button to apply a new threshold. The threshold editor window will list all the applied thresholds if any. We can also edit applied thresholds by clicking on the ‘Edit’ button.

Click on ‘Add’ tab to apply a new threshold.

Group:
If grouping is applied on any row of the grid chart, we can apply a threshold on group rows/cells. Using the ‘Group’ field we can decide on which rows we want to apply thresholds, i.e. on individual rows or grouped rows. Select ‘No grouping’ to apply a threshold on normal rows or select the group row to apply a threshold on group rows.

Metric:
Select the metric on which you want to apply a threshold in ‘Metric’ drop down box.
Select Target:
In ‘Select Target’ drop down box select the type of threshold you want; a row or cell highlighter. For example, if I apply a threshold for Profit top 5 apply green color, using ‘Cell’ in ‘Select Target’, the threshold will display as shown in the below screenshot.

If we apply ‘Row’ in the ‘Select Target’ drop down box the same threshold will be as shown in the below screenshot.

Select Condition:
When you select any threshold condition, the threshold editor window will stretch into its complete view. Below is a screenshot of the full threshold editor window.

Give all the inputs in the threshold editor window. In the ‘Value(s)’ text input box, give appropriate input value according to the threshold condition.Using ‘Background Color’ we can apply colors to the background of the text.Using ‘Color’ we can apply colors to the text where the threshold condition is true. We can show an icon along with text, in the cells where the threshold condition is true. Select any icon from the drop-down box. Apply color for the icon using the ‘Icon Color’ color input tab, and assign a size to icons using the ‘Select Size’ text input box. We can show only in the cells where the threshold condition is true. To apply this property, enable ‘Icon Only’ checkbox. After all the inputs are entered click on the ‘Apply’ tab.

Below is a screenshot of the Vitara grid chart showing the result of the above threshold on the metric - ‘Profit’.

If you want to apply another threshold condition on the same metric click on the ‘Add’ button.

Threshold on ‘Group By’ headers
Please see the below screenshot of the Vitara grid chart, where grouping is applied on the ‘Product Category’ attribute. The default aggregation function applied is ‘Sum’.

We can also apply thresholds on these group header aggregations. Open threshold editor window using any of the three possible ways: ‘Edit’ button, ‘Hamburger’ button, ‘Right click’ on the chart.Below is the screenshot of the threshold editor window. Click on ‘Add’ button to define a new threshold.

Expand the ‘Group’ drop-down box. It will show two segments, ‘No grouping’ and the attribute names on which grouping is applied. In our example, as we applied to group on the ‘Product Category’ attribute, the threshold window will show this attribute.

Select ‘No grouping’ if you want to apply thresholds for normal data rows and select the attribute name, e.g. Product Category, to apply thresholds on group headers.Give all the inputs in the threshold editor window. Below is the screenshot applying thresholds on aggregation values.

Enhancements in 4.6.1 version
There are two enhancements in thresholds property in 4.6.1 version.
1. Ability to select threshold source and target.
2. Ability to apply threshold on attributes.
Ability to select threshold source and target.
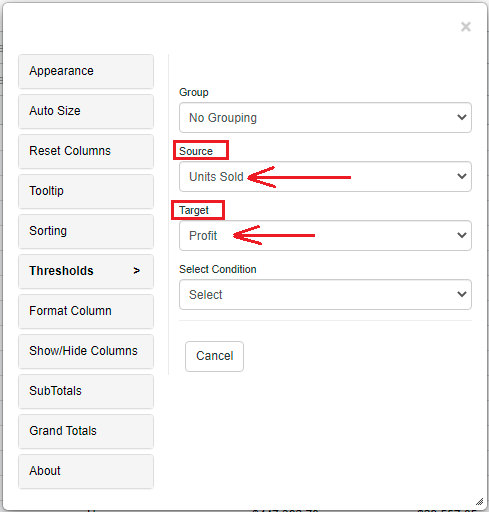
In the new threshold editor window you can select source and target for a threshold. The source and target can any metric or attributes availabel in the grid. Basically, this feature allows you to apply threshold on metric using the values of other metric.

Attribute thresholds in Grid chart
From the 4.6.1 version of Vitara charts, we can apply thresholds using attributes.
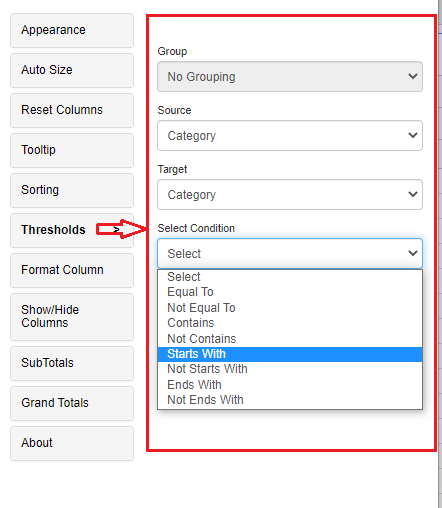
The source and target drop down boxes in the threshold editor window will list all the attributes and metrics in the chart. We can select an attribute as source and select an attribute as target then define a threshold condition. We have ‘Equal to’, ‘Not Equal to’, ‘Contains’, ‘Not Contains’, ‘Starts with’, ‘Not Starts with’, ‘Ends with’ and ‘Not Ends with’ are the attribute conditions that can be applied.
Click on the ‘Add’ tab to apply a new threshold. Select the Category attribute in Source and Target dropdowns.
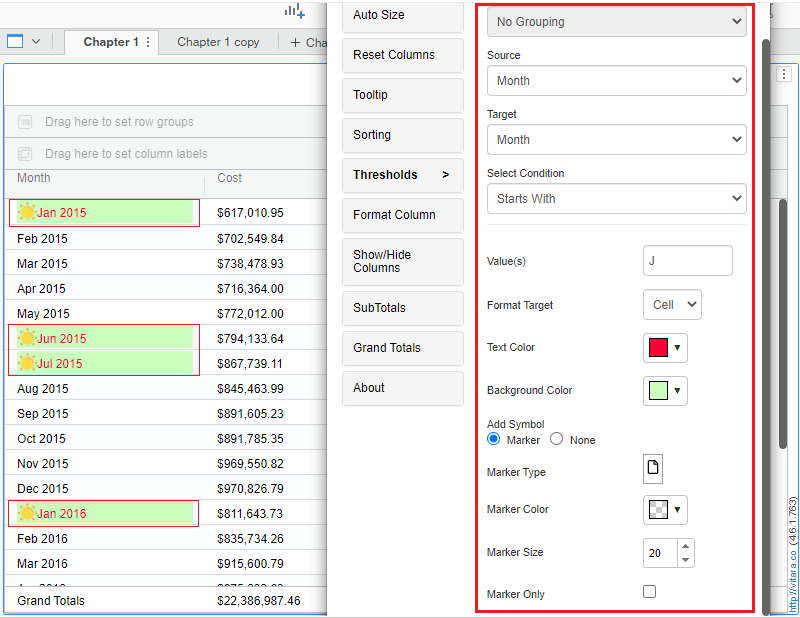
In the below screenshot, Month attribute is selected in Source and Target drop downs and applied ‘Starts with’ condition with value ‘J’ and applied .svg marker. The threshold can be displayed as shown in the below screenshot.

